
Use a simple threading technique and pony beads to make a lizard keychain! Hang it on your backpack, in your room, or as a keychain for your library card. Pick up a craft kit in the Youth Services Department or at the drive-up window, available while supplies last. Recommended for ages 6 and up.
In this kit:
- String
- 28 green beads
- 12 orange or yellow beads
- 7 purple beads
- 2 blue beads
- 1 keyring
You will need:
- Scissors
 Directions:
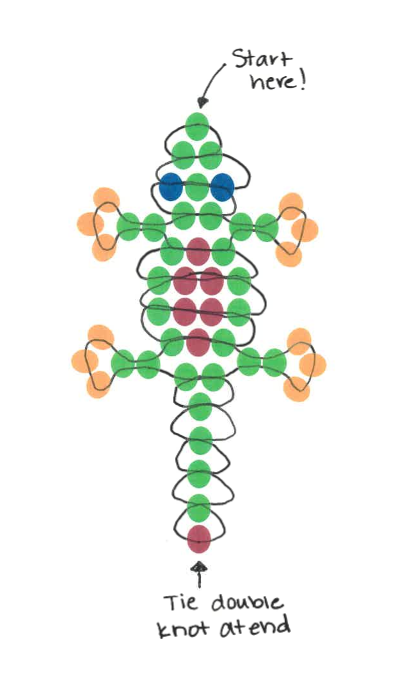
- Place one green bead in the middle of the string. This will be your lizard’s nose. Now you have a right string and a left string (they should be about the same length).
- String two green beads onto the right string. Now, thread the left string back through the two green beads. Pull it tight to make a triangle. These beads are now double-threaded. This is the technique you will use to make the rest of the lizard!
- Thread a blue, green, and then blue bead onto the right string. Put the left thread back through the three beads, and pull tight.
- String two green beads onto the right string. Put the left string back through, and pull tight.
- Now you will make the lizard’s front feet. Thread two green beads and three orange beads onto the right string. Using the same right string, thread it back through only the two green beads, and pull tight. You may need to hold onto the lizard or also pull on the left side to get it pulled tight enough. Keep pulling it snug; you’ll get there!
- Repeat step 5 using the left string. Thread two green beads and three orange beads onto the left string. Using the same left string, thread it back through only the two green beads, and pull until snug.
- Thread a green, purple, green bead onto the right string, and put the left string back through to double thread.
- Continue double threading following the color pattern on the first page (the Pattern Page included shows the same pattern; it just shows you how the string looks on the inside). Repeat steps 5 and 6 to make the lizard’s back legs.
- Once you get to the end of the pattern, tie a double knot and make sure it’s secure.
- Tie the remaining string onto your keychain. Tie a double or triple knot to make sure it’s good and secure. Cut the ends of the thread.
Ta-da! You now have a lizard keychain!
– Laura, Youth Services Manager